Compiling and running
Running
To make local development more convenient, you can use the following run configuration to launch Tachiyomi directly at the Browse panel:
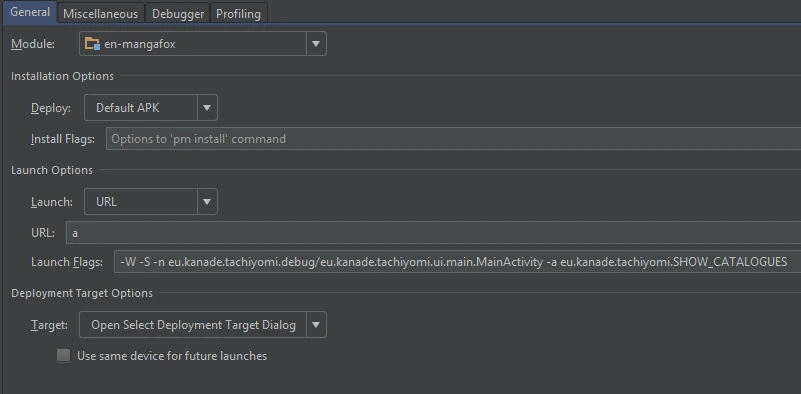
If you're running a Preview or debug build of Tachiyomi:
-W -S -n eu.kanade.tachiyomi.debug/eu.kanade.tachiyomi.ui.main.MainActivity -a eu.kanade.tachiyomi.SHOW_CATALOGUESAnd for a release build of Tachiyomi:
-W -S -n eu.kanade.tachiyomi/eu.kanade.tachiyomi.ui.main.MainActivity -a eu.kanade.tachiyomi.SHOW_CATALOGUESIMPORTANT
If you're deploying to Android 11 or higher, enable the "Always install with package manager" option in the run configurations. Without this option enabled, you might face issues such as Android Studio running an older version of the extension without the modifications you might have done.
Debugging
Android Debugger
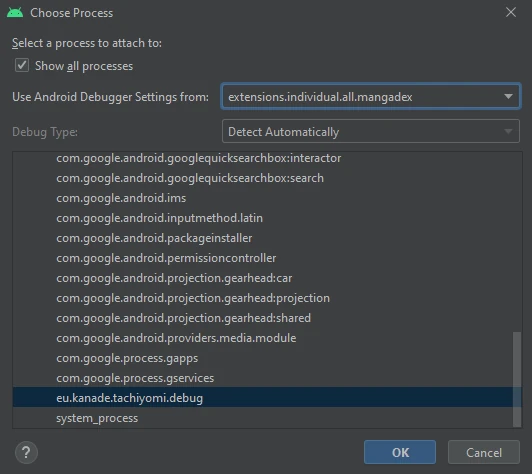
You can leverage the Android Debugger to step through your extension while debugging.
You cannot simply use Android Studio's Debug 'module.name' -> this will most likely result in an error while launching.
Instead, once you've built and installed your extension on the target device, use Attach Debugger to Android Process to start debugging Tachiyomi.
Logs
You can also elect to simply rely on logs printed from your extension, which show up in the Logcat panel of Android Studio.
Inspecting network calls
One of the easiest way to inspect network issues (such as HTTP errors 404, 429, no chapter found etc.) is to use the Logcat panel of Android Studio and filtering by the OkHttpClient tag.
To be able to check the calls done by OkHttp, you need to enable verbose logging in the app, that is not enabled by default and is only included in the Preview versions of Tachiyomi. To enable it, go to -> -> and confirm that Verbose logging is enabled. After enabling it, don't forget to restart the app.
Inspecting the Logcat allows you to get a good look at the call flow and it's more than enough in most cases where issues occurs. However, alternatively, you can also use an external tool like mitm-proxy. For that, refer to the subsequent sections.
On newer Android Studio versions, you can use its built-in Network Inspector inside the App Inspection tool window. This feature provides a nice GUI to inspect the requests made in the app.
To use it, follow the official documentation and select Tachiyomi package name in the process list.
Using external network inspecting tools
If you want to take a deeper look into the network flow, such as taking a look into the request and response bodies, you can use an external tool like mitm-proxy.
Setup your proxy server
We are going to use mitm-proxy but you can replace it with any other Web Debugger (i.e. Charles, Burp Suite, Fiddler etc). To install and execute, follow the commands bellow.
Install the tool.
$ sudo pip3 install mitmproxy
Execute the web interface and the proxy.
$ mitmweb
Alternatively, you can also use the Docker image:
$ docker run --rm -it -p 8080:8080 \
    -p 127.0.0.1:8081:8081 \
    --web-host 0.0.0.0 \
    mitmproxy/mitmproxy mitmweb
After installing and running, open your browser and navigate to http://127.0.0.1:8081.
OkHttp proxy setup
Since most of the manga sources are going to use HTTPS, we need to disable SSL verification in order to use the web debugger. For that, add this code to inside your source class:
package eu.kanade.tachiyomi.extension.en.mysource

import android.annotation.SuppressLint
import eu.kanade.tachiyomi.source.online.HttpSource
import okhttp3.OkHttpClient
import java.net.InetSocketAddress
import java.net.Proxy
import java.security.SecureRandom
import java.security.cert.X509Certificate
import javax.net.ssl.SSLContext
import javax.net.ssl.TrustManager
import javax.net.ssl.X509TrustManager

class MySource : HttpSource() {
    private fun OkHttpClient.Builder.ignoreAllSSLErrors(): OkHttpClient.Builder {
        val naiveTrustManager = @SuppressLint("CustomX509TrustManager")
        object : X509TrustManager {
            override fun getAcceptedIssuers(): Array<X509Certificate> = emptyArray()
            override fun checkClientTrusted(certs: Array<X509Certificate>, authType: String) = Unit
            override fun checkServerTrusted(certs: Array<X509Certificate>, authType: String) = Unit
        }

        val insecureSocketFactory = SSLContext.getInstance("TLSv1.2").apply {
            val trustAllCerts = arrayOf<TrustManager>(naiveTrustManager)
            init(null, trustAllCerts, SecureRandom())
        }.socketFactory

        sslSocketFactory(insecureSocketFactory, naiveTrustManager)
        hostnameVerifier { _, _ -> true }
        return this
    }

    override val client: OkHttpClient = network.cloudflareClient.newBuilder()
        .ignoreAllSSLErrors()
        .proxy(Proxy(Proxy.Type.HTTP, InetSocketAddress("10.0.2.2", 8080)))
        .build()
}
Note: 10.0.2.2 is usually the address of your loopback interface in the android emulator. If Tachiyomi tells you that it's unable to connect to 10.0.2.2:8080 you will likely need to change it (the same if you are using hardware device).
If all went well, you should see all requests and responses made by the source in the web interface of mitmweb.
Building
APKs can be created in Android Studio via Build > Build Bundle(s) / APK(s) > Build APK(s) or Build > Generate Signed Bundle / APK.